Free
CarRentory Free Setup
CarRentory Free is a complete standalone booking plugin. Follow the sections below in order to create your fleet, connect the required pages, accept offline bookings and test the customer journey.
You do not need WooCommerce or CarRentory Pro to accept and manage booking requests.
Explore the
live CarRentory demo . The demo may include optional Pro features that are not part of the Free plugin.
01
Installation
Go to WordPress Admin → Plugins → Add New .
Click Upload Plugin .
Select the CarRentory ZIP file you downloaded. The filename may include the plugin version.
Click Install Now .
Click Activate Plugin .
Do not extract the ZIP before uploading it. WordPress.org may provide a versioned filename; the installed plugin folder is always carrentory.
After activation, you will see a new admin menu: CarRentory
02
Basic Settings
Go to CarRentory → Settings . The settings are organized into these tabs.
General
Currency
Currency position
Date format
Time format
Minimum rental days
Admin notification email
Business Hours
Opening time
Closing time
Time step
Closed weekdays
Closed dates
Frontend
Search Results page
Booking page
Terms page
Privacy page
Vehicles per row
Payments (Free)
Pay on Arrival
Bank Transfer
Titles and customer instructions
Tax / VAT (Free)
Enable VAT
VAT rate
VAT label
Exclusive VAT calculation
Multilingual
Display translations
Payment instructions
Email header/footer text
Terms and privacy pages
Stripe Checkout and inclusive VAT are added by CarRentory Pro and do not appear in Free settings.
03
Create the Required Pages
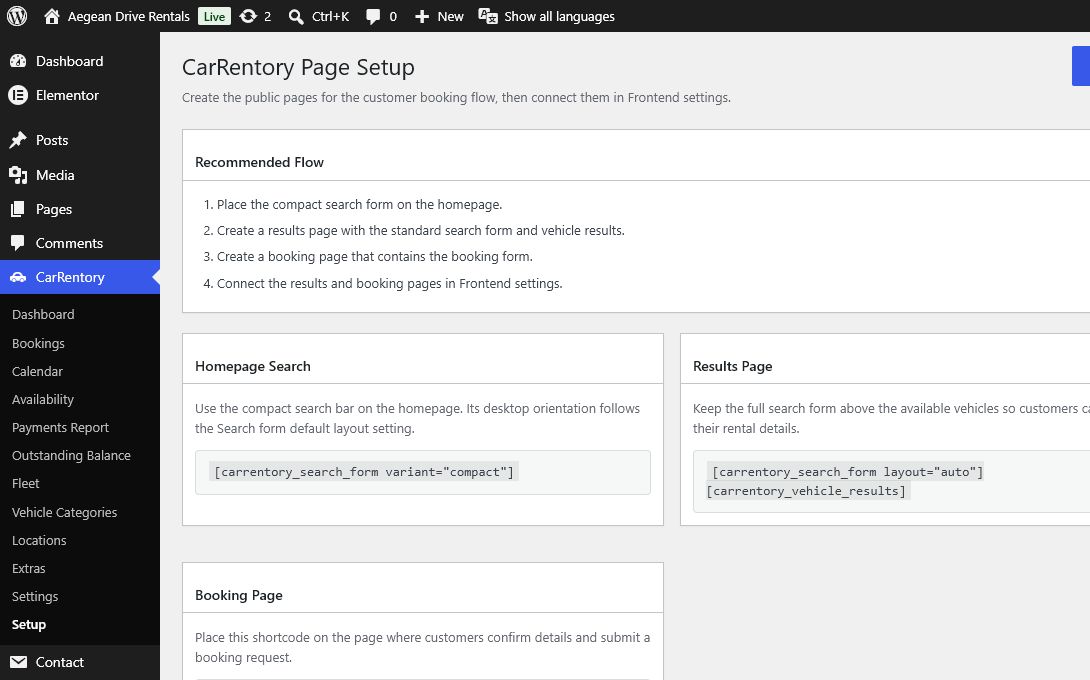
Open CarRentory → Setup . Create the three customer-flow pages shown there and use the exact shortcodes below.
Homepage
Place the compact search bar where customers start their rental search.
[carrentory_search_form variant="compact"]
Search Results Page
Add both shortcodes in this order, in the same page content.
[carrentory_search_form layout="auto"][carrentory_vehicle_results]
Booking Page
This page receives the selected vehicle and rental details from the results page.
[carrentory_booking_form]
Connect the flow
Publish all three pages.
Go to CarRentory → Settings → Frontend .
Select the published Search Results and Booking pages from their dropdowns.
Select the Terms and Privacy pages if you use them in the booking form.
Open the homepage and complete one search to confirm the results page receives the dates and locations.
Common mistake: do not place the results or booking shortcode on more than one public page. CarRentory needs one connected page for each step so links and redirects remain predictable.
The Setup screen is the source of truth for the current page flow and shortcode attributes.
04
Add Locations
Go to CarRentory → Locations and create your pickup/drop-off locations.
Title
Sort order
Active status
Pickup and drop-off fees are available only when CarRentory Pro is active.
05
Add Vehicles
Go to CarRentory → Vehicles and create your vehicles.
Title
Description
Featured image
Category
Brand / model / year
Seats / doors / luggage
Fuel type
Transmission
Base daily price
Quantity
The quantity controls how many bookings can overlap for the same vehicle.
08
Set Basic VAT / Tax
Go to CarRentory → Settings → Tax / VAT .
Enable VAT
VAT rate
VAT label
Example
VAT rate: 24
VAT label: VAT
Free calculates VAT on top of the configured prices. The option to treat prices as VAT-inclusive belongs to CarRentory Pro.
09
Set Offline Payment Methods
Go to CarRentory → Settings → Payments .
Pay on Arrival
Enable manual payment at pickup.
Bank Transfer
Add payment instructions and bank details.
Stripe Checkout is optional and appears only when CarRentory Pro is installed and active.
10
Email Settings / HTML Emails
CarRentory includes branded HTML email notifications for admin and customer booking communication.
Email types
Admin new booking notification
Customer booking request received
Customer booking confirmed
Customer booking cancelled
Email content
Booking reference
Booking details
Selected extras
Price, VAT and payment summary
Translated customer emails based on checkout language
12
Multilingual Setup
CarRentory is translation-ready and includes English, German, Greek, Spanish, French, Italian and Dutch language files. Its display-translation system lets one fleet show customer-facing text in different languages without duplicating vehicles, locations, extras, prices or availability.
Set up a translated customer journey
Set the main site language in Settings → General → Site Language .
Go to CarRentory → Settings → Multilingual .
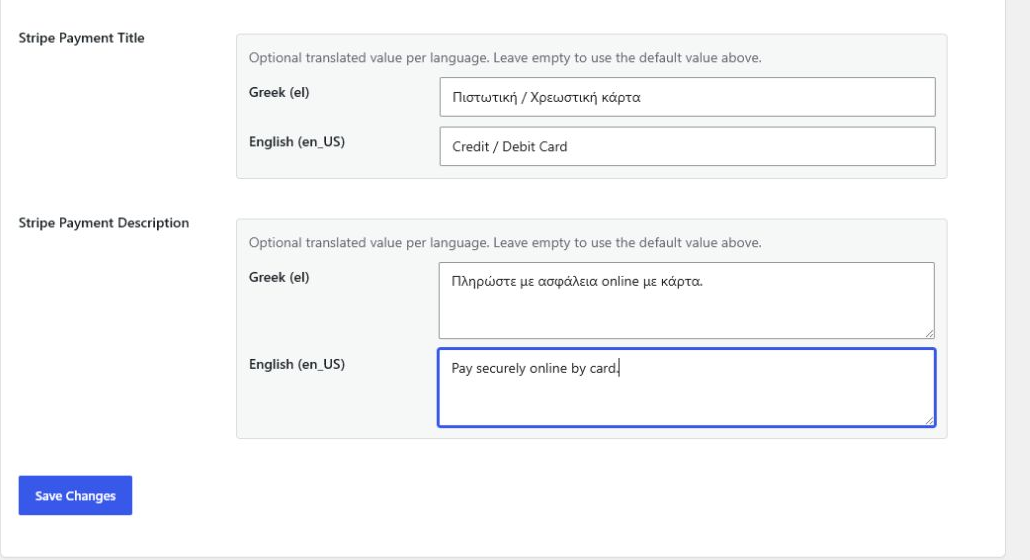
Add translated payment titles, payment instructions, legal-page values and email header/footer text. Leave a field empty to use its default value.
Open each Vehicle, Location, Extra and Vehicle Category, then complete its Display Translations fields.
Test Search → Results → Booking → Confirmation and the customer email in every language you plan to use.
Worked example
A single vehicle can keep its base title Economy Car while displaying Οικονομικό Αυτοκίνητο in Greek and Kompaktwagen in German. Quantity, availability and pricing still belong to the same vehicle.
Fallback behavior
When a translated field is empty, CarRentory shows the default title, description or setting. This lets you publish gradually without creating blank customer-facing content.
Each supported language has its own optional display value. Empty values fall back to the default setting.
CarRentory includes a built-in multilingual display runtime and Polylang-aware page and language handling. Polylang is not bundled with the plugin and no official Polylang certification is claimed. WPML is not supported in the current release.
13
Test Before Launch
Search form
Vehicle results
Booking form
Extras total update
Basic VAT breakdown
Pay on Arrival booking
Bank Transfer booking
Admin booking screen
Customer email
Admin email
Mobile results search/filter flow
Sticky mobile total bar
Inline translated validation errors
Compact booking success screen
15
Shortcode Summary
Compact homepage search
[carrentory_search_form variant="compact"]
Results-page search
[carrentory_search_form layout="auto"]
Vehicle results, directly below the results-page search
[carrentory_vehicle_results]
Booking form
[carrentory_booking_form]
These are the same shortcodes shown in CarRentory → Setup . The base shortcode [carrentory_search_form] is registered, but the attributes above select the intended UI for each step of the customer flow.
Customize
Frontend Template Overrides
Every customer-facing template supplied by CarRentory Free can be copied to your theme or child theme and customized without editing plugin files.
Simple example
Copy the plugin search form:
wp-content/plugins/carrentory/templates/search/form.phpto the same relative path inside your child theme:
wp-content/themes/your-child-theme/carrentory/search/form.phpCarRentory checks the child theme first and uses the bundled template only when no override exists.
Overrideable areas
Search form, summary and filters
Results and vehicle cards
Booking form sections
Payments and pricing breakdown
Notices and confirmation
Keep in plugin logic
Availability queries
Pricing and VAT calculations
Booking creation
Payment processing
Email and redirect logic
Preserve field names, IDs and data-carrentory-* attributes used by the frontend scripts. Escape all output with the appropriate WordPress function.
Developers
Hooks and Filters Reference
CarRentory Free and Pro 1.0.0 expose 124 reviewed public extension points: 62 actions and 62 filters. The canonical allowlist classifies them as 66 visual, 34 admin, 17 integration and 7 logic extension points. Internal adapters, removed hooks and legacy licensing hooks are excluded.
Minimal safe filter example
add_filter( 'carrentory_pricing_adjustments', function ( $adjustments ) {
    return $adjustments;
} );
Filters must return the first value with the expected type. Start by returning it unchanged, then make the smallest required adjustment.
Minimal safe action example
add_action( 'carrentory_after_booking_calendar', function ( $context ) {
    // Add admin-only presentation or controls here.
}, 10, 1 );
Register customizations in a small site plugin or a child theme. Use the documented argument order and accepted-argument count when your callback needs context.
Choose the correct extension layer. Use template overrides for complete presentation changes, visual hooks for focused content changes, admin hooks for management extensions, logic filters for bounded behavior changes and integration hooks for custom or external code. Do not move booking, pricing, payment or permission logic into templates.
Visual hooks 66 hooks Add or adjust customer-facing content without replacing complete templates.
carrentory_after_active_filtersAction Free
Adds project-specific content or integration handling immediately after the standard active filters step.
Name carrentory_after_active_filters
Type Action
Edition Free
Practical outcome Visual
Callback arguments $carrentory_args
Return value None. WordPress ignores action callback return values.
Minimal safe example
add_action( 'carrentory_after_active_filters', function ( $carrentory_args ) {
    echo '<span class="my-site-carrentory-note">' . esc_html__( 'Additional rental information', 'my-site' ) . '</span>';
}, 10, 1 );
carrentory_after_booking_confirmationAction Free
Adds project-specific content or integration handling immediately after the standard booking confirmation step.
Name carrentory_after_booking_confirmation
Type Action
Edition Free
Practical outcome Visual
Callback arguments $carrentory_args
Return value None. WordPress ignores action callback return values.
Minimal safe example
add_action( 'carrentory_after_booking_confirmation', function ( $carrentory_args ) {
    echo '<span class="my-site-carrentory-note">' . esc_html__( 'Additional rental information', 'my-site' ) . '</span>';
}, 10, 1 );
carrentory_after_booking_customer_detailsAction Free
Adds project-specific content or integration handling immediately after the standard booking customer details step.
Name carrentory_after_booking_customer_details
Type Action
Edition Free
Practical outcome Visual
Callback arguments $carrentory_args
Return value None. WordPress ignores action callback return values.
Minimal safe example
add_action( 'carrentory_after_booking_customer_details', function ( $carrentory_args ) {
    echo '<span class="my-site-carrentory-note">' . esc_html__( 'Additional rental information', 'my-site' ) . '</span>';
}, 10, 1 );
carrentory_after_booking_extrasAction Free
Adds project-specific content or integration handling immediately after the standard booking extras step.
Name carrentory_after_booking_extras
Type Action
Edition Free
Practical outcome Visual
Callback arguments $carrentory_args
Return value None. WordPress ignores action callback return values.
Minimal safe example
add_action( 'carrentory_after_booking_extras', function ( $carrentory_args ) {
    echo '<span class="my-site-carrentory-note">' . esc_html__( 'Additional rental information', 'my-site' ) . '</span>';
}, 10, 1 );
carrentory_after_booking_formAction Free
Adds project-specific content or integration handling immediately after the standard booking form step.
Name carrentory_after_booking_form
Type Action
Edition Free
Practical outcome Visual
Callback arguments $carrentory_args
Return value None. WordPress ignores action callback return values.
Minimal safe example
add_action( 'carrentory_after_booking_form', function ( $carrentory_args ) {
    echo '<span class="my-site-carrentory-note">' . esc_html__( 'Additional rental information', 'my-site' ) . '</span>';
}, 10, 1 );
carrentory_after_booking_payment_methodsAction Free
Adds project-specific content or integration handling immediately after the standard booking payment methods step.
Name carrentory_after_booking_payment_methods
Type Action
Edition Free
Practical outcome Visual
Callback arguments $carrentory_args
Return value None. WordPress ignores action callback return values.
Minimal safe example
add_action( 'carrentory_after_booking_payment_methods', function ( $carrentory_args ) {
    echo '<span class="my-site-carrentory-note">' . esc_html__( 'Additional rental information', 'my-site' ) . '</span>';
}, 10, 1 );
carrentory_after_booking_summaryAction Free
Adds project-specific content or integration handling immediately after the standard booking summary step.
Name carrentory_after_booking_summary
Type Action
Edition Free
Practical outcome Visual
Callback arguments $carrentory_args
Return value None. WordPress ignores action callback return values.
Minimal safe example
add_action( 'carrentory_after_booking_summary', function ( $carrentory_args ) {
    echo '<span class="my-site-carrentory-note">' . esc_html__( 'Additional rental information', 'my-site' ) . '</span>';
}, 10, 1 );
carrentory_after_booking_termsAction Free
Adds project-specific content or integration handling immediately after the standard booking terms step.
Name carrentory_after_booking_terms
Type Action
Edition Free
Practical outcome Visual
Callback arguments $carrentory_args
Return value None. WordPress ignores action callback return values.
Minimal safe example
add_action( 'carrentory_after_booking_terms', function ( $carrentory_args ) {
    echo '<span class="my-site-carrentory-note">' . esc_html__( 'Additional rental information', 'my-site' ) . '</span>';
}, 10, 1 );
carrentory_after_frontend_errorAction Free
Adds project-specific content or integration handling immediately after the standard frontend error step.
Name carrentory_after_frontend_error
Type Action
Edition Free
Practical outcome Visual
Callback arguments $carrentory_args
Return value None. WordPress ignores action callback return values.
Minimal safe example
add_action( 'carrentory_after_frontend_error', function ( $carrentory_args ) {
    echo '<span class="my-site-carrentory-note">' . esc_html__( 'Additional rental information', 'my-site' ) . '</span>';
}, 10, 1 );
carrentory_after_frontend_noticeAction Free
Adds project-specific content or integration handling immediately after the standard frontend notice step.
Name carrentory_after_frontend_notice
Type Action
Edition Free
Practical outcome Visual
Callback arguments $carrentory_args
Return value None. WordPress ignores action callback return values.
Minimal safe example
add_action( 'carrentory_after_frontend_notice', function ( $carrentory_args ) {
    echo '<span class="my-site-carrentory-note">' . esc_html__( 'Additional rental information', 'my-site' ) . '</span>';
}, 10, 1 );
carrentory_after_no_resultsAction Free
Adds project-specific content or integration handling immediately after the standard no results step.
Name carrentory_after_no_results
Type Action
Edition Free
Practical outcome Visual
Callback arguments $carrentory_args
Return value None. WordPress ignores action callback return values.
Minimal safe example
add_action( 'carrentory_after_no_results', function ( $carrentory_args ) {
    echo '<span class="my-site-carrentory-note">' . esc_html__( 'Additional rental information', 'my-site' ) . '</span>';
}, 10, 1 );
carrentory_after_pricing_breakdownAction Free
Adds project-specific content or integration handling immediately after the standard pricing breakdown step.
Name carrentory_after_pricing_breakdown
Type Action
Edition Free
Practical outcome Visual
Callback arguments $carrentory_args
Return value None. WordPress ignores action callback return values.
Minimal safe example
add_action( 'carrentory_after_pricing_breakdown', function ( $carrentory_args ) {
    echo '<span class="my-site-carrentory-note">' . esc_html__( 'Additional rental information', 'my-site' ) . '</span>';
}, 10, 1 );
carrentory_after_search_filtersAction Free
Adds project-specific content or integration handling immediately after the standard search filters step.
Name carrentory_after_search_filters
Type Action
Edition Free
Practical outcome Visual
Callback arguments $carrentory_args
Return value None. WordPress ignores action callback return values.
Minimal safe example
add_action( 'carrentory_after_search_filters', function ( $carrentory_args ) {
    echo '<span class="my-site-carrentory-note">' . esc_html__( 'Additional rental information', 'my-site' ) . '</span>';
}, 10, 1 );
carrentory_after_search_formAction Free
Adds project-specific content or integration handling immediately after the standard search form step.
Name carrentory_after_search_form
Type Action
Edition Free
Practical outcome Visual
Callback arguments $carrentory_args
Return value None. WordPress ignores action callback return values.
Minimal safe example
add_action( 'carrentory_after_search_form', function ( $carrentory_args ) {
    echo '<span class="my-site-carrentory-note">' . esc_html__( 'Additional rental information', 'my-site' ) . '</span>';
}, 10, 1 );
carrentory_after_search_resultsAction Free
Adds project-specific content or integration handling immediately after the standard search results step.
Name carrentory_after_search_results
Type Action
Edition Free
Practical outcome Visual
Callback arguments $carrentory_args
Return value None. WordPress ignores action callback return values.
Minimal safe example
add_action( 'carrentory_after_search_results', function ( $carrentory_args ) {
    echo '<span class="my-site-carrentory-note">' . esc_html__( 'Additional rental information', 'my-site' ) . '</span>';
}, 10, 1 );
carrentory_after_search_summaryAction Free
Adds project-specific content or integration handling immediately after the standard search summary step.
Name carrentory_after_search_summary
Type Action
Edition Free
Practical outcome Visual
Callback arguments $carrentory_args
Return value None. WordPress ignores action callback return values.
Minimal safe example
add_action( 'carrentory_after_search_summary', function ( $carrentory_args ) {
    echo '<span class="my-site-carrentory-note">' . esc_html__( 'Additional rental information', 'my-site' ) . '</span>';
}, 10, 1 );
carrentory_after_templateAction Free
Adds project-specific content or integration handling immediately after the standard template step.
Name carrentory_after_template
Type Action
Edition Free
Practical outcome Visual
Callback arguments $template_name, $located, $args
Return value None. WordPress ignores action callback return values.
Minimal safe example
add_action( 'carrentory_after_template', function ( $template_name, $located, $args ) {
    echo '<span class="my-site-carrentory-note">' . esc_html__( 'Additional rental information', 'my-site' ) . '</span>';
}, 10, 3 );
carrentory_after_vehicle_cardAction Free
Adds project-specific content or integration handling immediately after the standard vehicle card step.
Name carrentory_after_vehicle_card
Type Action
Edition Free
Practical outcome Visual
Callback arguments $view_data
Return value None. WordPress ignores action callback return values.
Minimal safe example
add_action( 'carrentory_after_vehicle_card', function ( $view_data ) {
    echo '<span class="my-site-carrentory-note">' . esc_html__( 'Additional rental information', 'my-site' ) . '</span>';
}, 10, 1 );
carrentory_after_vehicle_listingAction Free
Adds project-specific content or integration handling immediately after the standard vehicle listing step.
Name carrentory_after_vehicle_listing
Type Action
Edition Free
Practical outcome Visual
Callback arguments $carrentory_args
Return value None. WordPress ignores action callback return values.
Minimal safe example
add_action( 'carrentory_after_vehicle_listing', function ( $carrentory_args ) {
    echo '<span class="my-site-carrentory-note">' . esc_html__( 'Additional rental information', 'my-site' ) . '</span>';
}, 10, 1 );
carrentory_before_active_filtersAction Free
Adds project-specific content or integration handling immediately before the standard active filters step.
Name carrentory_before_active_filters
Type Action
Edition Free
Practical outcome Visual
Callback arguments $carrentory_args
Return value None. WordPress ignores action callback return values.
Minimal safe example
add_action( 'carrentory_before_active_filters', function ( $carrentory_args ) {
    echo '<span class="my-site-carrentory-note">' . esc_html__( 'Additional rental information', 'my-site' ) . '</span>';
}, 10, 1 );
carrentory_before_booking_confirmationAction Free
Adds project-specific content or integration handling immediately before the standard booking confirmation step.
Name carrentory_before_booking_confirmation
Type Action
Edition Free
Practical outcome Visual
Callback arguments $carrentory_args
Return value None. WordPress ignores action callback return values.
Minimal safe example
add_action( 'carrentory_before_booking_confirmation', function ( $carrentory_args ) {
    echo '<span class="my-site-carrentory-note">' . esc_html__( 'Additional rental information', 'my-site' ) . '</span>';
}, 10, 1 );
carrentory_before_booking_customer_detailsAction Free
Adds project-specific content or integration handling immediately before the standard booking customer details step.
Name carrentory_before_booking_customer_details
Type Action
Edition Free
Practical outcome Visual
Callback arguments $carrentory_args
Return value None. WordPress ignores action callback return values.
Minimal safe example
add_action( 'carrentory_before_booking_customer_details', function ( $carrentory_args ) {
    echo '<span class="my-site-carrentory-note">' . esc_html__( 'Additional rental information', 'my-site' ) . '</span>';
}, 10, 1 );
carrentory_before_booking_extrasAction Free
Adds project-specific content or integration handling immediately before the standard booking extras step.
Name carrentory_before_booking_extras
Type Action
Edition Free
Practical outcome Visual
Callback arguments $carrentory_args
Return value None. WordPress ignores action callback return values.
Minimal safe example
add_action( 'carrentory_before_booking_extras', function ( $carrentory_args ) {
    echo '<span class="my-site-carrentory-note">' . esc_html__( 'Additional rental information', 'my-site' ) . '</span>';
}, 10, 1 );
carrentory_before_booking_formAction Free
Adds project-specific content or integration handling immediately before the standard booking form step.
Name carrentory_before_booking_form
Type Action
Edition Free
Practical outcome Visual
Callback arguments $carrentory_args
Return value None. WordPress ignores action callback return values.
Minimal safe example
add_action( 'carrentory_before_booking_form', function ( $carrentory_args ) {
    echo '<span class="my-site-carrentory-note">' . esc_html__( 'Additional rental information', 'my-site' ) . '</span>';
}, 10, 1 );
carrentory_before_booking_payment_methodsAction Free
Adds project-specific content or integration handling immediately before the standard booking payment methods step.
Name carrentory_before_booking_payment_methods
Type Action
Edition Free
Practical outcome Visual
Callback arguments $carrentory_args
Return value None. WordPress ignores action callback return values.
Minimal safe example
add_action( 'carrentory_before_booking_payment_methods', function ( $carrentory_args ) {
    echo '<span class="my-site-carrentory-note">' . esc_html__( 'Additional rental information', 'my-site' ) . '</span>';
}, 10, 1 );
carrentory_before_booking_summaryAction Free
Adds project-specific content or integration handling immediately before the standard booking summary step.
Name carrentory_before_booking_summary
Type Action
Edition Free
Practical outcome Visual
Callback arguments $carrentory_args
Return value None. WordPress ignores action callback return values.
Minimal safe example
add_action( 'carrentory_before_booking_summary', function ( $carrentory_args ) {
    echo '<span class="my-site-carrentory-note">' . esc_html__( 'Additional rental information', 'my-site' ) . '</span>';
}, 10, 1 );
carrentory_before_booking_termsAction Free
Adds project-specific content or integration handling immediately before the standard booking terms step.
Name carrentory_before_booking_terms
Type Action
Edition Free
Practical outcome Visual
Callback arguments $carrentory_args
Return value None. WordPress ignores action callback return values.
Minimal safe example
add_action( 'carrentory_before_booking_terms', function ( $carrentory_args ) {
    echo '<span class="my-site-carrentory-note">' . esc_html__( 'Additional rental information', 'my-site' ) . '</span>';
}, 10, 1 );
carrentory_before_frontend_errorAction Free
Adds project-specific content or integration handling immediately before the standard frontend error step.
Name carrentory_before_frontend_error
Type Action
Edition Free
Practical outcome Visual
Callback arguments $carrentory_args
Return value None. WordPress ignores action callback return values.
Minimal safe example
add_action( 'carrentory_before_frontend_error', function ( $carrentory_args ) {
    echo '<span class="my-site-carrentory-note">' . esc_html__( 'Additional rental information', 'my-site' ) . '</span>';
}, 10, 1 );
carrentory_before_frontend_noticeAction Free
Adds project-specific content or integration handling immediately before the standard frontend notice step.
Name carrentory_before_frontend_notice
Type Action
Edition Free
Practical outcome Visual
Callback arguments $carrentory_args
Return value None. WordPress ignores action callback return values.
Minimal safe example
add_action( 'carrentory_before_frontend_notice', function ( $carrentory_args ) {
    echo '<span class="my-site-carrentory-note">' . esc_html__( 'Additional rental information', 'my-site' ) . '</span>';
}, 10, 1 );
carrentory_before_no_resultsAction Free
Adds project-specific content or integration handling immediately before the standard no results step.
Name carrentory_before_no_results
Type Action
Edition Free
Practical outcome Visual
Callback arguments $carrentory_args
Return value None. WordPress ignores action callback return values.
Minimal safe example
add_action( 'carrentory_before_no_results', function ( $carrentory_args ) {
    echo '<span class="my-site-carrentory-note">' . esc_html__( 'Additional rental information', 'my-site' ) . '</span>';
}, 10, 1 );
carrentory_before_pricing_breakdownAction Free
Adds project-specific content or integration handling immediately before the standard pricing breakdown step.
Name carrentory_before_pricing_breakdown
Type Action
Edition Free
Practical outcome Visual
Callback arguments $carrentory_args
Return value None. WordPress ignores action callback return values.
Minimal safe example
add_action( 'carrentory_before_pricing_breakdown', function ( $carrentory_args ) {
    echo '<span class="my-site-carrentory-note">' . esc_html__( 'Additional rental information', 'my-site' ) . '</span>';
}, 10, 1 );
carrentory_before_search_filtersAction Free
Adds project-specific content or integration handling immediately before the standard search filters step.
Name carrentory_before_search_filters
Type Action
Edition Free
Practical outcome Visual
Callback arguments $carrentory_args
Return value None. WordPress ignores action callback return values.
Minimal safe example
add_action( 'carrentory_before_search_filters', function ( $carrentory_args ) {
    echo '<span class="my-site-carrentory-note">' . esc_html__( 'Additional rental information', 'my-site' ) . '</span>';
}, 10, 1 );
carrentory_before_search_formAction Free
Adds project-specific content or integration handling immediately before the standard search form step.
Name carrentory_before_search_form
Type Action
Edition Free
Practical outcome Visual
Callback arguments $carrentory_args
Return value None. WordPress ignores action callback return values.
Minimal safe example
add_action( 'carrentory_before_search_form', function ( $carrentory_args ) {
    echo '<span class="my-site-carrentory-note">' . esc_html__( 'Additional rental information', 'my-site' ) . '</span>';
}, 10, 1 );
carrentory_before_search_resultsAction Free
Adds project-specific content or integration handling immediately before the standard search results step.
Name carrentory_before_search_results
Type Action
Edition Free
Practical outcome Visual
Callback arguments $carrentory_args
Return value None. WordPress ignores action callback return values.
Minimal safe example
add_action( 'carrentory_before_search_results', function ( $carrentory_args ) {
    echo '<span class="my-site-carrentory-note">' . esc_html__( 'Additional rental information', 'my-site' ) . '</span>';
}, 10, 1 );
carrentory_before_search_summaryAction Free
Adds project-specific content or integration handling immediately before the standard search summary step.
Name carrentory_before_search_summary
Type Action
Edition Free
Practical outcome Visual
Callback arguments $carrentory_args
Return value None. WordPress ignores action callback return values.
Minimal safe example
add_action( 'carrentory_before_search_summary', function ( $carrentory_args ) {
    echo '<span class="my-site-carrentory-note">' . esc_html__( 'Additional rental information', 'my-site' ) . '</span>';
}, 10, 1 );
carrentory_before_templateAction Free
Adds project-specific content or integration handling immediately before the standard template step.
Name carrentory_before_template
Type Action
Edition Free
Practical outcome Visual
Callback arguments $template_name, $located, $args
Return value None. WordPress ignores action callback return values.
Minimal safe example
add_action( 'carrentory_before_template', function ( $template_name, $located, $args ) {
    echo '<span class="my-site-carrentory-note">' . esc_html__( 'Additional rental information', 'my-site' ) . '</span>';
}, 10, 3 );
carrentory_before_vehicle_cardAction Free
Adds project-specific content or integration handling immediately before the standard vehicle card step.
Name carrentory_before_vehicle_card
Type Action
Edition Free
Practical outcome Visual
Callback arguments $view_data
Return value None. WordPress ignores action callback return values.
Minimal safe example
add_action( 'carrentory_before_vehicle_card', function ( $view_data ) {
    echo '<span class="my-site-carrentory-note">' . esc_html__( 'Additional rental information', 'my-site' ) . '</span>';
}, 10, 1 );
carrentory_before_vehicle_listingAction Free
Adds project-specific content or integration handling immediately before the standard vehicle listing step.
Name carrentory_before_vehicle_listing
Type Action
Edition Free
Practical outcome Visual
Callback arguments $carrentory_args
Return value None. WordPress ignores action callback return values.
Minimal safe example
add_action( 'carrentory_before_vehicle_listing', function ( $carrentory_args ) {
    echo '<span class="my-site-carrentory-note">' . esc_html__( 'Additional rental information', 'my-site' ) . '</span>';
}, 10, 1 );
carrentory_booking_confirmation_dataFilter Free
Adjusts the customer-facing booking confirmation data data before the approved template renders it.
Name carrentory_booking_confirmation_data
Type Filter
Edition Free
Practical outcome Visual
Callback arguments $view_data, $booking_id
Return value Return $view_data with the same documented data type.
Minimal safe example
add_filter( 'carrentory_booking_confirmation_data', function ( $view_data, $booking_id ) {
    // Adjust only documented or project-owned values.
    return $view_data;
}, 10, 2 );
carrentory_booking_customer_details_dataFilter Free
Adjusts the customer-facing booking customer details data data before the approved template renders it.
Name carrentory_booking_customer_details_data
Type Filter
Edition Free
Practical outcome Visual
Callback arguments $view_data, $submitted_customer
Return value Return $view_data with the same documented data type.
Minimal safe example
add_filter( 'carrentory_booking_customer_details_data', function ( $view_data, $submitted_customer ) {
    // Adjust only documented or project-owned values.
    return $view_data;
}, 10, 2 );
carrentory_booking_extras_dataFilter Free
Adjusts the customer-facing booking extras data data before the approved template renders it.
Name carrentory_booking_extras_data
Type Filter
Edition Free
Practical outcome Visual
Callback arguments $view_data, $active_extras, $selected_extras
Return value Return $view_data with the same documented data type.
Minimal safe example
add_filter( 'carrentory_booking_extras_data', function ( $view_data, $active_extras, $selected_extras ) {
    // Adjust only documented or project-owned values.
    return $view_data;
}, 10, 3 );
carrentory_booking_form_dataFilter Free
Adjusts the customer-facing booking form data data before the approved template renders it.
Name carrentory_booking_form_data
Type Filter
Edition Free
Practical outcome Visual
Callback arguments $booking_form_data, $values, $pricing, $submission_result
Return value Return $booking_form_data with the same documented data type.
Minimal safe example
add_filter( 'carrentory_booking_form_data', function ( $booking_form_data, $values, $pricing, $submission_result ) {
    // Adjust only documented or project-owned values.
    return $booking_form_data;
}, 10, 4 );
carrentory_booking_payment_displayFilter Free
Adjusts the customer-facing booking payment display data before the approved template renders it.
Name carrentory_booking_payment_display
Type Filter
Edition Free
Practical outcome Visual
Callback arguments $display, $booking_id, $method, $payment_methods, $admin
Return value Return $display with the same documented data type.
Minimal safe example
add_filter( 'carrentory_booking_payment_display', function ( $display, $booking_id, $method, $payment_methods, $admin ) {
    // Adjust only documented or project-owned values.
    return $display;
}, 10, 5 );
carrentory_booking_payment_methods_dataFilter Free
Adjusts the customer-facing booking payment methods data data before the approved template renders it.
Name carrentory_booking_payment_methods_data
Type Filter
Edition Free
Practical outcome Visual
Callback arguments $view_data, $payment_methods, $selected_method
Return value Return $view_data with the same documented data type.
Minimal safe example
add_filter( 'carrentory_booking_payment_methods_data', function ( $view_data, $payment_methods, $selected_method ) {
    // Adjust only documented or project-owned values.
    return $view_data;
}, 10, 3 );
carrentory_booking_summary_dataFilter Free
Adjusts the customer-facing booking summary data data before the approved template renders it.
Name carrentory_booking_summary_data
Type Filter
Edition Free
Practical outcome Visual
Callback arguments $view_data, $values, $pricing
Return value Return $view_data with the same documented data type.
Minimal safe example
add_filter( 'carrentory_booking_summary_data', function ( $view_data, $values, $pricing ) {
    // Adjust only documented or project-owned values.
    return $view_data;
}, 10, 3 );
carrentory_booking_terms_dataFilter Free
Adjusts the customer-facing booking terms data data before the approved template renders it.
Name carrentory_booking_terms_data
Type Filter
Edition Free
Practical outcome Visual
Callback arguments $view_data, $terms_accepted, $terms_page_url
Return value Return $view_data with the same documented data type.
Minimal safe example
add_filter( 'carrentory_booking_terms_data', function ( $view_data, $terms_accepted, $terms_page_url ) {
    // Adjust only documented or project-owned values.
    return $view_data;
}, 10, 3 );
carrentory_default_template_pathFilter Free
Adjusts the customer-facing default template path data before the approved template renders it.
Name carrentory_default_template_path
Type Filter
Edition Free
Practical outcome Visual
Callback arguments $default_path
Return value Return $default_path with the same documented data type.
Minimal safe example
add_filter( 'carrentory_default_template_path', function ( $default_path ) {
    // Adjust only documented or project-owned values.
    return $default_path;
}, 10, 1 );
carrentory_frontend_error_dataFilter Free
Adjusts the customer-facing frontend error data data before the approved template renders it.
Name carrentory_frontend_error_data
Type Filter
Edition Free
Practical outcome Visual
Callback arguments $view_data, $errors
Return value Return $view_data with the same documented data type.
Minimal safe example
add_filter( 'carrentory_frontend_error_data', function ( $view_data, $errors ) {
    // Adjust only documented or project-owned values.
    return $view_data;
}, 10, 2 );
carrentory_frontend_notice_dataFilter Free
Adjusts the customer-facing frontend notice data data before the approved template renders it.
Name carrentory_frontend_notice_data
Type Filter
Edition Free
Practical outcome Visual
Callback arguments $view_data, $message, $type
Return value Return $view_data with the same documented data type.
Minimal safe example
add_filter( 'carrentory_frontend_notice_data', function ( $view_data, $message, $type ) {
    // Adjust only documented or project-owned values.
    return $view_data;
}, 10, 3 );
carrentory_frontend_view_dataFilter Free
Adjusts the customer-facing frontend view data data before the approved template renders it.
Name carrentory_frontend_view_data
Type Filter
Edition Free
Practical outcome Visual
Callback arguments $view_data, $template_name, $view
Return value Return $view_data with the same documented data type.
Minimal safe example
add_filter( 'carrentory_frontend_view_data', function ( $view_data, $template_name, $view ) {
    // Adjust only documented or project-owned values.
    return $view_data;
}, 10, 3 );
carrentory_get_template_argsFilter Free
Adjusts the customer-facing get template args data before the approved template renders it.
Name carrentory_get_template_args
Type Filter
Edition Free
Practical outcome Visual
Callback arguments $args, $template_name, $located
Return value Return $args with the same documented data type.
Minimal safe example
add_filter( 'carrentory_get_template_args', function ( $args, $template_name, $located ) {
    // Adjust only documented or project-owned values.
    return $args;
}, 10, 3 );
carrentory_locate_templateFilter Free
Adjusts the customer-facing locate template data before the approved template renders it.
Name carrentory_locate_template
Type Filter
Edition Free
Practical outcome Visual
Callback arguments $located, $template_name, $template_path, $default_path
Return value Return $located with the same documented data type.
Minimal safe example
add_filter( 'carrentory_locate_template', function ( $located, $template_name, $template_path, $default_path ) {
    // Adjust only documented or project-owned values.
    return $located;
}, 10, 4 );
carrentory_payment_method_dataFilter Free
Adjusts the customer-facing payment method data data before the approved template renders it.
Name carrentory_payment_method_data
Type Filter
Edition Free
Practical outcome Visual
Callback arguments $method, $key, $gateway, $context, $component
Return value Return $method with the same documented data type.
Minimal safe example
add_filter( 'carrentory_payment_method_data', function ( $method, $key, $gateway, $context, $component ) {
    // Adjust only documented or project-owned values.
    return $method;
}, 10, 5 );
carrentory_payment_methodsFilter Free
Adjusts the customer-facing payment methods data before the approved template renders it.
Name carrentory_payment_methods
Type Filter
Edition Free
Practical outcome Visual
Callback arguments $methods, $context, $component
Return value Return $methods with the same documented data type.
Minimal safe example
add_filter( 'carrentory_payment_methods', function ( $methods, $context, $component ) {
    // Adjust only documented or project-owned values.
    return $methods;
}, 10, 3 );
carrentory_pricing_breakdown_dataFilter Free
Adjusts the customer-facing pricing breakdown data data before the approved template renders it.
Name carrentory_pricing_breakdown_data
Type Filter
Edition Free
Practical outcome Visual
Callback arguments $view_data, $breakdown, $pricing
Return value Return $view_data with the same documented data type.
Minimal safe example
add_filter( 'carrentory_pricing_breakdown_data', function ( $view_data, $breakdown, $pricing ) {
    // Adjust only documented or project-owned values.
    return $view_data;
}, 10, 3 );
carrentory_search_active_filters_dataFilter Free
Adjusts the customer-facing search active filters data data before the approved template renders it.
Name carrentory_search_active_filters_data
Type Filter
Edition Free
Practical outcome Visual
Callback arguments $view_data, $values
Return value Return $view_data with the same documented data type.
Minimal safe example
add_filter( 'carrentory_search_active_filters_data', function ( $view_data, $values ) {
    // Adjust only documented or project-owned values.
    return $view_data;
}, 10, 2 );
carrentory_search_filters_dataFilter Free
Adjusts the customer-facing search filters data data before the approved template renders it.
Name carrentory_search_filters_data
Type Filter
Edition Free
Practical outcome Visual
Callback arguments $view_data, $values, $preserve_search_values
Return value Return $view_data with the same documented data type.
Minimal safe example
add_filter( 'carrentory_search_filters_data', function ( $view_data, $values, $preserve_search_values ) {
    // Adjust only documented or project-owned values.
    return $view_data;
}, 10, 3 );
carrentory_search_form_dataFilter Free
Adjusts the customer-facing search form data data before the approved template renders it.
Name carrentory_search_form_data
Type Filter
Edition Free
Practical outcome Visual
Callback arguments $view_data, $atts
Return value Return $view_data with the same documented data type.
Minimal safe example
add_filter( 'carrentory_search_form_data', function ( $view_data, $atts ) {
    // Adjust only documented or project-owned values.
    return $view_data;
}, 10, 2 );
carrentory_search_no_results_dataFilter Free
Adjusts the customer-facing search no results data data before the approved template renders it.
Name carrentory_search_no_results_data
Type Filter
Edition Free
Practical outcome Visual
Callback arguments $view_data, $values, $is_search_mode
Return value Return $view_data with the same documented data type.
Minimal safe example
add_filter( 'carrentory_search_no_results_data', function ( $view_data, $values, $is_search_mode ) {
    // Adjust only documented or project-owned values.
    return $view_data;
}, 10, 3 );
carrentory_search_results_dataFilter Free
Adjusts the customer-facing search results data data before the approved template renders it.
Name carrentory_search_results_data
Type Filter
Edition Free
Practical outcome Visual
Callback arguments $results_data, $results, $values
Return value Return $results_data with the same documented data type.
Minimal safe example
add_filter( 'carrentory_search_results_data', function ( $results_data, $results, $values ) {
    // Adjust only documented or project-owned values.
    return $results_data;
}, 10, 3 );
carrentory_search_summary_dataFilter Free
Adjusts the customer-facing search summary data data before the approved template renders it.
Name carrentory_search_summary_data
Type Filter
Edition Free
Practical outcome Visual
Callback arguments $view_data, $values, $pickup_datetime, $dropoff_datetime
Return value Return $view_data with the same documented data type.
Minimal safe example
add_filter( 'carrentory_search_summary_data', function ( $view_data, $values, $pickup_datetime, $dropoff_datetime ) {
    // Adjust only documented or project-owned values.
    return $view_data;
}, 10, 4 );
carrentory_template_partFilter Free
Adjusts the customer-facing template part data before the approved template renders it.
Name carrentory_template_part
Type Filter
Edition Free
Practical outcome Visual
Callback arguments $templates, $slug, $name, $args
Return value Return $templates with the same documented data type.
Minimal safe example
add_filter( 'carrentory_template_part', function ( $templates, $slug, $name, $args ) {
    // Adjust only documented or project-owned values.
    return $templates;
}, 10, 4 );
carrentory_template_pathFilter Free
Adjusts the customer-facing template path data before the approved template renders it.
Name carrentory_template_path
Type Filter
Edition Free
Practical outcome Visual
Callback arguments $template_path
Return value Return $template_path with the same documented data type.
Minimal safe example
add_filter( 'carrentory_template_path', function ( $template_path ) {
    // Adjust only documented or project-owned values.
    return $template_path;
}, 10, 1 );
carrentory_vehicle_card_dataFilter Free
Adjusts the customer-facing vehicle card data data before the approved template renders it.
Name carrentory_vehicle_card_data
Type Filter
Edition Free
Practical outcome Visual
Callback arguments $view_data, $result
Return value Return $view_data with the same documented data type.
Minimal safe example
add_filter( 'carrentory_vehicle_card_data', function ( $view_data, $result ) {
    // Adjust only documented or project-owned values.
    return $view_data;
}, 10, 2 );
carrentory_vehicle_list_dataFilter Free
Adjusts the customer-facing vehicle list data data before the approved template renders it.
Name carrentory_vehicle_list_data
Type Filter
Edition Free
Practical outcome Visual
Callback arguments $vehicle_list_data, $results_data, $results, $values
Return value Return $vehicle_list_data with the same documented data type.
Minimal safe example
add_filter( 'carrentory_vehicle_list_data', function ( $vehicle_list_data, $results_data, $results, $values ) {
    // Adjust only documented or project-owned values.
    return $vehicle_list_data;
}, 10, 4 );
carrentory_vehicle_results_dataFilter Free
Adjusts the customer-facing vehicle results data data before the approved template renders it.
Name carrentory_vehicle_results_data
Type Filter
Edition Free
Practical outcome Visual
Callback arguments $results_data, $results, $values
Return value Return $results_data with the same documented data type.
Minimal safe example
add_filter( 'carrentory_vehicle_results_data', function ( $results_data, $results, $values ) {
    // Adjust only documented or project-owned values.
    return $results_data;
}, 10, 3 );
Admin hooks 34 hooks Extend genuine WordPress administration surfaces while preserving CarRentory capability and callback contracts.
carrentory_admin_booking_email_payment_rowsFilter Free
Extends the admin booking email payment rows administration data while preserving built-in permission and callback rules.
Name carrentory_admin_booking_email_payment_rows
Type Filter
Edition Free
Practical outcome Admin
Callback arguments $payment_rows, $booking_id, $payment_display, $admin
Return value Return $payment_rows with the same documented data type.
Minimal safe example
add_filter( 'carrentory_admin_booking_email_payment_rows', function ( $payment_rows, $booking_id, $payment_display, $admin ) {
    // Adjust only documented or project-owned values.
    return $payment_rows;
}, 10, 4 );
carrentory_admin_booking_payment_detail_rowsFilter Free
Extends the admin booking payment detail rows administration data while preserving built-in permission and callback rules.
Name carrentory_admin_booking_payment_detail_rows
Type Filter
Edition Free
Practical outcome Admin
Callback arguments $rows, $post_id, $method, $meta, $admin
Return value Return $rows with the same documented data type.
Minimal safe example
add_filter( 'carrentory_admin_booking_payment_detail_rows', function ( $rows, $post_id, $method, $meta, $admin ) {
    // Adjust only documented or project-owned values.
    return $rows;
}, 10, 5 );
carrentory_admin_booking_payment_email_displayFilter Free
Extends the admin booking payment email display administration data while preserving built-in permission and callback rules.
Name carrentory_admin_booking_payment_email_display
Type Filter
Edition Free
Practical outcome Admin
Callback arguments $display, $post_id, $method, $settings, $admin
Return value Return $display with the same documented data type.
Minimal safe example
add_filter( 'carrentory_admin_booking_payment_email_display', function ( $display, $post_id, $method, $settings, $admin ) {
    // Adjust only documented or project-owned values.
    return $display;
}, 10, 5 );
carrentory_admin_booking_payment_method_filter_optionsFilter Free
Extends the admin booking payment method filter options administration data while preserving built-in permission and callback rules.
Name carrentory_admin_booking_payment_method_filter_options
Type Filter
Edition Free
Practical outcome Admin
Callback arguments $options, $admin
Return value Return $options with the same documented data type.
Minimal safe example
add_filter( 'carrentory_admin_booking_payment_method_filter_options', function ( $options, $admin ) {
    // Adjust only documented or project-owned values.
    return $options;
}, 10, 2 );
carrentory_admin_booking_payment_method_instructionsFilter Free
Extends the admin booking payment method instructions administration data while preserving built-in permission and callback rules.
Name carrentory_admin_booking_payment_method_instructions
Type Filter
Edition Free
Practical outcome Admin
Callback arguments $instructions, $method, $settings, $post_id, $admin
Return value Return $instructions with the same documented data type.
Minimal safe example
add_filter( 'carrentory_admin_booking_payment_method_instructions', function ( $instructions, $method, $settings, $post_id, $admin ) {
    // Adjust only documented or project-owned values.
    return $instructions;
}, 10, 5 );
carrentory_admin_booking_payment_method_labelFilter Free
Extends the admin booking payment method label administration data while preserving built-in permission and callback rules.
Name carrentory_admin_booking_payment_method_label
Type Filter
Edition Free
Practical outcome Admin
Callback arguments $label, $method, $post_id, $admin
Return value Return $label with the same documented data type.
Minimal safe example
add_filter( 'carrentory_admin_booking_payment_method_label', function ( $label, $method, $post_id, $admin ) {
    // Adjust only documented or project-owned values.
    return $label;
}, 10, 4 );
carrentory_admin_dashboard_after_summaryAction Free
Adds an admin-only control or status at the admin dashboard after summary extension point.
Name carrentory_admin_dashboard_after_summary
Type Action
Edition Free
Practical outcome Admin
Callback arguments $dashboard_context, $admin
Return value None. WordPress ignores action callback return values.
Minimal safe example
add_action( 'carrentory_admin_dashboard_after_summary', function ( $dashboard_context, $admin ) {
    echo '<span class="description">' . esc_html__( 'Custom admin information', 'my-site' ) . '</span>';
}, 10, 2 );
carrentory_admin_dashboard_sectionsFilter Free
Extends the admin dashboard sections administration data while preserving built-in permission and callback rules.
Name carrentory_admin_dashboard_sections
Type Filter
Edition Free
Practical outcome Admin
Callback arguments $sections, $dashboard_context, $admin
Return value Return $sections with the same documented data type.
Minimal safe example
add_filter( 'carrentory_admin_dashboard_sections', function ( $sections, $dashboard_context, $admin ) {
    // Adjust only documented or project-owned values.
    return $sections;
}, 10, 3 );
carrentory_admin_menu_itemsFilter Free
Adds or reorders CarRentory admin submenu definitions. It cannot lower the capability or replace the callback of a built-in admin page.
Name carrentory_admin_menu_items
Type Filter
Edition Free
Practical outcome Admin
Callback arguments $items, $admin
Return value Return $items with the same documented data type.
Minimal safe example
add_filter( 'carrentory_admin_menu_items', function ( $items, $admin ) {
    $items[] = array(
        'key'        => 'my_site_tools',
        'page_title' => __( 'Rental Tools', 'my-site' ),
        'menu_title' => __( 'Rental Tools', 'my-site' ),
        'capability' => 'manage_options',
        'menu_slug'  => 'my-site-rental-tools',
        'callback'   => 'my_site_render_rental_tools',
        'parent'     => 'carrentory',
        'register'   => true,
    );
    return $items;
}, 10, 2 );
carrentory_after_admin_dashboardAction Free
Adds project-specific content or integration handling immediately after the standard admin dashboard step.
Name carrentory_after_admin_dashboard
Type Action
Edition Free
Practical outcome Admin
Callback arguments $dashboard_context, $admin
Return value None. WordPress ignores action callback return values.
Minimal safe example
add_action( 'carrentory_after_admin_dashboard', function ( $dashboard_context, $admin ) {
    echo '<span class="description">' . esc_html__( 'Custom admin information', 'my-site' ) . '</span>';
}, 10, 2 );
carrentory_after_booking_calendarAction Free
Adds project-specific content or integration handling immediately after the standard booking calendar step.
Name carrentory_after_booking_calendar
Type Action
Edition Free
Practical outcome Admin
Callback arguments $calendar_context, $admin
Return value None. WordPress ignores action callback return values.
Minimal safe example
add_action( 'carrentory_after_booking_calendar', function ( $calendar_context, $admin ) {
    echo '<span class="description">' . esc_html__( 'Custom admin information', 'my-site' ) . '</span>';
}, 10, 2 );
carrentory_after_settings_fieldAction Free
Adds project-specific content or integration handling immediately after the standard settings field step.
Name carrentory_after_settings_field
Type Action
Edition Free
Practical outcome Admin
Callback arguments $field, $settings, $settings_component
Return value None. WordPress ignores action callback return values.
Minimal safe example
add_action( 'carrentory_after_settings_field', function ( $field, $settings, $settings_component ) {
    echo '<span class="description">' . esc_html__( 'Custom admin information', 'my-site' ) . '</span>';
}, 10, 3 );
carrentory_after_settings_sectionAction Free
Adds project-specific content or integration handling immediately after the standard settings section step.
Name carrentory_after_settings_section
Type Action
Edition Free
Practical outcome Admin
Callback arguments $tab_key, $section_key, $args, $settings, $settings_component
Return value None. WordPress ignores action callback return values.
Minimal safe example
add_action( 'carrentory_after_settings_section', function ( $tab_key, $section_key, $args, $settings, $settings_component ) {
    echo '<span class="description">' . esc_html__( 'Custom admin information', 'my-site' ) . '</span>';
}, 10, 5 );
carrentory_after_settings_tabAction Free
Adds project-specific content or integration handling immediately after the standard settings tab step.
Name carrentory_after_settings_tab
Type Action
Edition Free
Practical outcome Admin
Callback arguments $active_tab, $settings, $settings_component
Return value None. WordPress ignores action callback return values.
Minimal safe example
add_action( 'carrentory_after_settings_tab', function ( $active_tab, $settings, $settings_component ) {
    echo '<span class="description">' . esc_html__( 'Custom admin information', 'my-site' ) . '</span>';
}, 10, 3 );
carrentory_availability_page_actionsAction Free
Adds an admin-only control or status at the availability page actions extension point.
Name carrentory_availability_page_actions
Type Action
Edition Free
Practical outcome Admin
Callback arguments $availability_context, $component
Return value None. WordPress ignores action callback return values.
Minimal safe example
add_action( 'carrentory_availability_page_actions', function ( $availability_context, $component ) {
    echo '<span class="description">' . esc_html__( 'Custom admin information', 'my-site' ) . '</span>';
}, 10, 2 );
carrentory_before_admin_dashboardAction Free
Adds project-specific content or integration handling immediately before the standard admin dashboard step.
Name carrentory_before_admin_dashboard
Type Action
Edition Free
Practical outcome Admin
Callback arguments $dashboard_context, $admin
Return value None. WordPress ignores action callback return values.
Minimal safe example
add_action( 'carrentory_before_admin_dashboard', function ( $dashboard_context, $admin ) {
    echo '<span class="description">' . esc_html__( 'Custom admin information', 'my-site' ) . '</span>';
}, 10, 2 );
carrentory_before_booking_calendarAction Free
Adds project-specific content or integration handling immediately before the standard booking calendar step.
Name carrentory_before_booking_calendar
Type Action
Edition Free
Practical outcome Admin
Callback arguments $calendar_context, $admin
Return value None. WordPress ignores action callback return values.
Minimal safe example
add_action( 'carrentory_before_booking_calendar', function ( $calendar_context, $admin ) {
    echo '<span class="description">' . esc_html__( 'Custom admin information', 'my-site' ) . '</span>';
}, 10, 2 );
carrentory_before_settings_fieldAction Free
Adds project-specific content or integration handling immediately before the standard settings field step.
Name carrentory_before_settings_field
Type Action
Edition Free
Practical outcome Admin
Callback arguments $field, $settings, $settings_component
Return value None. WordPress ignores action callback return values.
Minimal safe example
add_action( 'carrentory_before_settings_field', function ( $field, $settings, $settings_component ) {
    echo '<span class="description">' . esc_html__( 'Custom admin information', 'my-site' ) . '</span>';
}, 10, 3 );
carrentory_before_settings_sectionAction Free
Adds project-specific content or integration handling immediately before the standard settings section step.
Name carrentory_before_settings_section
Type Action
Edition Free
Practical outcome Admin
Callback arguments $tab_key, $section_key, $args, $settings, $settings_component
Return value None. WordPress ignores action callback return values.
Minimal safe example
add_action( 'carrentory_before_settings_section', function ( $tab_key, $section_key, $args, $settings, $settings_component ) {
    echo '<span class="description">' . esc_html__( 'Custom admin information', 'my-site' ) . '</span>';
}, 10, 5 );
carrentory_before_settings_tabAction Free
Adds project-specific content or integration handling immediately before the standard settings tab step.
Name carrentory_before_settings_tab
Type Action
Edition Free
Practical outcome Admin
Callback arguments $active_tab, $settings, $settings_component
Return value None. WordPress ignores action callback return values.
Minimal safe example
add_action( 'carrentory_before_settings_tab', function ( $active_tab, $settings, $settings_component ) {
    echo '<span class="description">' . esc_html__( 'Custom admin information', 'my-site' ) . '</span>';
}, 10, 3 );
carrentory_booking_calendar_actionsAction Free
Adds an admin-only control or status at the booking calendar actions extension point.
Name carrentory_booking_calendar_actions
Type Action
Edition Free
Practical outcome Admin
Callback arguments $calendar_context, $admin
Return value None. WordPress ignores action callback return values.
Minimal safe example
add_action( 'carrentory_booking_calendar_actions', function ( $calendar_context, $admin ) {
    echo '<span class="description">' . esc_html__( 'Custom admin information', 'my-site' ) . '</span>';
}, 10, 2 );
carrentory_booking_calendar_row_actionsAction Free
Adds an admin-only control or status at the booking calendar row actions extension point.
Name carrentory_booking_calendar_row_actions
Type Action
Edition Free
Practical outcome Admin
Callback arguments $action_context, $booking, $admin
Return value None. WordPress ignores action callback return values.
Minimal safe example
add_action( 'carrentory_booking_calendar_row_actions', function ( $action_context, $booking, $admin ) {
    echo '<span class="description">' . esc_html__( 'Custom admin information', 'my-site' ) . '</span>';
}, 10, 3 );
carrentory_booking_edit_actionsAction Free
Adds an admin-only control or status at the booking edit actions extension point.
Name carrentory_booking_edit_actions
Type Action
Edition Free
Practical outcome Admin
Callback arguments $context, $booking, $admin
Return value None. WordPress ignores action callback return values.
Minimal safe example
add_action( 'carrentory_booking_edit_actions', function ( $context, $booking, $admin ) {
    echo '<span class="description">' . esc_html__( 'Custom admin information', 'my-site' ) . '</span>';
}, 10, 3 );
carrentory_booking_list_export_actionsAction Free
Adds an admin-only control or status at the booking list export actions extension point.
Name carrentory_booking_list_export_actions
Type Action
Edition Free
Practical outcome Admin
Callback arguments $filters, $admin
Return value None. WordPress ignores action callback return values.
Minimal safe example
add_action( 'carrentory_booking_list_export_actions', function ( $filters, $admin ) {
    echo '<span class="description">' . esc_html__( 'Custom admin information', 'my-site' ) . '</span>';
}, 10, 2 );
carrentory_booking_list_filter_actionsAction Free
Adds an admin-only control or status at the booking list filter actions extension point.
Name carrentory_booking_list_filter_actions
Type Action
Edition Free
Practical outcome Admin
Callback arguments $filters, $admin
Return value None. WordPress ignores action callback return values.
Minimal safe example
add_action( 'carrentory_booking_list_filter_actions', function ( $filters, $admin ) {
    echo '<span class="description">' . esc_html__( 'Custom admin information', 'my-site' ) . '</span>';
}, 10, 2 );
carrentory_booking_row_actionsFilter Free
Extends the booking row actions administration data while preserving built-in permission and callback rules.
Name carrentory_booking_row_actions
Type Filter
Edition Free
Practical outcome Admin
Callback arguments $actions, $context, $post, $admin
Return value Return $actions with the same documented data type.
Minimal safe example
add_filter( 'carrentory_booking_row_actions', function ( $actions, $context, $post, $admin ) {
    // Adjust only documented or project-owned values.
    return $actions;
}, 10, 4 );
carrentory_reports_menu_itemsFilter Free
Adds custom report submenu definitions. Every report remains protected by manage_options; this filter is not a way to bypass that capability.
Name carrentory_reports_menu_items
Type Filter
Edition Free
Practical outcome Admin
Callback arguments $items, $admin
Return value Return $items with the same documented data type.
Minimal safe example
add_filter( 'carrentory_reports_menu_items', function ( $items, $admin ) {
    $items[] = array(
        'key'        => 'my_site_report',
        'page_title' => __( 'My Site Report', 'my-site' ),
        'menu_title' => __( 'My Site Report', 'my-site' ),
        'capability' => 'manage_options',
        'menu_slug'  => 'my-site-report',
        'callback'   => 'my_site_render_report',
        'register'   => true,
    );
    return $items;
}, 10, 2 );
carrentory_reports_page_actionsAction Pro
Adds an admin-only control or status at the reports page actions extension point.
Name carrentory_reports_page_actions
Type Action
Edition Pro
Practical outcome Admin
Callback arguments $report_key, $context, $admin
Return value None. WordPress ignores action callback return values.
Minimal safe example
add_action( 'carrentory_reports_page_actions', function ( $report_key, $context, $admin ) {
    echo '<span class="description">' . esc_html__( 'Custom admin information', 'my-site' ) . '</span>';
}, 10, 3 );
carrentory_settings_defaultsFilter Free
Extends the settings defaults administration data while preserving built-in permission and callback rules.
Name carrentory_settings_defaults
Type Filter
Edition Free
Practical outcome Admin
Callback arguments $defaults, $settings_component
Return value Return $defaults with the same documented data type.
Minimal safe example
add_filter( 'carrentory_settings_defaults', function ( $defaults, $settings_component ) {
    // Adjust only documented or project-owned values.
    return $defaults;
}, 10, 2 );
carrentory_settings_field_renderersFilter Free
Extends the settings field renderers administration data while preserving built-in permission and callback rules.
Name carrentory_settings_field_renderers
Type Filter
Edition Free
Practical outcome Admin
Callback arguments $renderers, $settings_component
Return value Return $renderers with the same documented data type.
Minimal safe example
add_filter( 'carrentory_settings_field_renderers', function ( $renderers, $settings_component ) {
    // Adjust only documented or project-owned values.
    return $renderers;
}, 10, 2 );
carrentory_settings_field_valueFilter Free
Extends the settings field value administration data while preserving built-in permission and callback rules.
Name carrentory_settings_field_value
Type Filter
Edition Free
Practical outcome Admin
Callback arguments $value, $field, $settings, $settings_component
Return value Return $value with the same documented data type.
Minimal safe example
add_filter( 'carrentory_settings_field_value', function ( $value, $field, $settings, $settings_component ) {
    // Adjust only documented or project-owned values.
    return $value;
}, 10, 4 );
carrentory_settings_fieldsFilter Free
Extends the settings fields administration data while preserving built-in permission and callback rules.
Name carrentory_settings_fields
Type Filter
Edition Free
Practical outcome Admin
Callback arguments $fields, $settings_component
Return value Return $fields with the same documented data type.
Minimal safe example
add_filter( 'carrentory_settings_fields', function ( $fields, $settings_component ) {
    // Adjust only documented or project-owned values.
    return $fields;
}, 10, 2 );
carrentory_settings_sectionsFilter Free
Extends the settings sections administration data while preserving built-in permission and callback rules.
Name carrentory_settings_sections
Type Filter
Edition Free
Practical outcome Admin
Callback arguments $sections, $settings_component
Return value Return $sections with the same documented data type.
Minimal safe example
add_filter( 'carrentory_settings_sections', function ( $sections, $settings_component ) {
    // Adjust only documented or project-owned values.
    return $sections;
}, 10, 2 );
carrentory_settings_tabsFilter Free
Extends the settings tabs administration data while preserving built-in permission and callback rules.
Name carrentory_settings_tabs
Type Filter
Edition Free
Practical outcome Admin
Callback arguments $tabs, $settings_component
Return value Return $tabs with the same documented data type.
Minimal safe example
add_filter( 'carrentory_settings_tabs', function ( $tabs, $settings_component ) {
    // Adjust only documented or project-owned values.
    return $tabs;
}, 10, 2 );
Logic filters 7 hooks Make bounded behavior changes. These filters cannot unlock entitlements, weaken payment validation or remove protected settings.
carrentory_allow_inclusive_vatFilter Free
Disables inclusive VAT when the feature is already entitled. It cannot enable inclusive VAT in Free or bypass Pro availability.
Name carrentory_allow_inclusive_vat
Type Filter
Edition Free
Practical outcome Logic
Callback arguments $allowed, $pricing_engine
Return value Return $allowed as a boolean; callbacks may only preserve or disable entitled inclusive VAT.
Minimal safe example
add_filter( 'carrentory_allow_inclusive_vat', function ( $allowed, $pricing_engine ) {
    return $allowed && (bool) get_option( 'my_site_allow_inclusive_vat', false );
}, 10, 2 );
carrentory_feature_availableFilter Free
Disables an already available feature for a project-specific condition. It cannot unlock a Pro feature or override entitlement checks.
Name carrentory_feature_available
Type Filter
Edition Free
Practical outcome Logic
Callback arguments $available, $key, $definition, $context, $feature_manager
Return value Return $available as a boolean; callbacks may only keep or disable existing availability.
Minimal safe example
add_filter( 'carrentory_feature_available', function ( $available, $key, $definition, $context, $feature_manager ) {
    if ( 'custom_reporting' === $key && ! current_user_can( 'manage_options' ) ) {
        return false;
    }
    return $available;
}, 10, 5 );
carrentory_payment_gateway_availableFilter Free
Disables an already available payment gateway for a project-specific condition. It cannot activate a gateway that is unavailable in the current edition or setup.
Name carrentory_payment_gateway_available
Type Filter
Edition Free
Practical outcome Logic
Callback arguments $available, $gateway, $context, $registry
Return value Return $available as a boolean; callbacks may only keep or disable existing availability.
Minimal safe example
add_filter( 'carrentory_payment_gateway_available', function ( $available, $gateway, $context, $registry ) {
    if ( 'stripe' === $gateway->get_key() && 'production' !== wp_get_environment_type() ) {
        return false;
    }
    return $available;
}, 10, 4 );
carrentory_payment_gateway_failure_blocks_successFilter Free
Makes payment failure handling stricter by requiring a failed gateway result to block booking success. It cannot ignore or suppress an online-payment failure.
Name carrentory_payment_gateway_failure_blocks_success
Type Filter
Edition Free
Practical outcome Logic
Callback arguments $blocks, $gateway, $result
Return value Return $blocks as a boolean; callbacks may only preserve or strengthen failure blocking.
Minimal safe example
add_filter( 'carrentory_payment_gateway_failure_blocks_success', function ( $blocks, $gateway, $result ) {
    return true;
}, 10, 3 );
carrentory_pricing_adjustmentsFilter Free
Adds validated, non-negative pre-tax pricing adjustments with a unique key, label and amount.
Name carrentory_pricing_adjustments
Type Filter
Edition Free
Practical outcome Logic
Callback arguments $adjustments, $context, $pricing_engine
Return value Return $adjustments with the same documented data type.
Minimal safe example
add_filter( 'carrentory_pricing_adjustments', function ( $adjustments, $context, $pricing_engine ) {
    $adjustments[] = array(
        'key'    => 'service_fee',
        'label'  => __( 'Service fee', 'my-site' ),
        'amount' => 12.50,
    );
    return $adjustments;
}, 10, 3 );
carrentory_pricing_daily_rate_dataFilter Free
Adjusts the daily rate amount, label and source for a specific vehicle, charge date and pricing context.
Name carrentory_pricing_daily_rate_data
Type Filter
Edition Free
Practical outcome Logic
Callback arguments $rate_data, $vehicle_id, $date, $context, $pricing_engine
Return value Return $rate_data with the same documented data type.
Minimal safe example
add_filter( 'carrentory_pricing_daily_rate_data', function ( $rate_data, $vehicle_id, $date, $context, $pricing_engine ) {
    if ( (int) get_option( 'my_site_featured_vehicle_id' ) === $vehicle_id ) {
        $rate_data['label'] = __( 'Preferred vehicle rate', 'my-site' );
    }
    return $rate_data;
}, 10, 5 );
carrentory_sanitize_settingsFilter Free
Sanitizes values owned by a custom settings extension after core settings have been processed. It must preserve protected values and return the complete settings array.
Name carrentory_sanitize_settings
Type Filter
Edition Free
Practical outcome Logic
Callback arguments $sanitized, $submitted, $existing, $settings_sanitizer
Return value Return $sanitized with the same documented data type.
Minimal safe example
add_filter( 'carrentory_sanitize_settings', function ( $sanitized, $submitted, $existing, $settings_sanitizer ) {
    if ( isset( $submitted['my_site_reference'] ) ) {
        $sanitized['my_site_reference'] = sanitize_text_field( $submitted['my_site_reference'] );
    }
    return $sanitized;
}, 10, 4 );
Integration hooks 17 hooks Connect supported external or project-specific code through reviewed data and lifecycle contracts.
carrentory_after_csv_exportAction Pro
Adds project-specific content or integration handling immediately after the standard csv export step.
Name carrentory_after_csv_export
Type Action
Edition Pro
Practical outcome Integration
Callback arguments $context, $component
Return value None. WordPress ignores action callback return values.
Minimal safe example
add_action( 'carrentory_after_csv_export', function ( $context, $component ) {
    do_action( 'my_site_carrentory_event', $context );
}, 10, 2 );
carrentory_after_payment_webhookAction Free
Adds project-specific content or integration handling immediately after the standard payment webhook step.
Name carrentory_after_payment_webhook
Type Action
Edition Free
Practical outcome Integration
Callback arguments $handler_key, $handler
Return value None. WordPress ignores action callback return values.
Minimal safe example
add_action( 'carrentory_after_payment_webhook', function ( $handler_key, $handler ) {
    do_action( 'my_site_carrentory_event', $handler_key );
}, 10, 2 );
carrentory_before_csv_exportAction Pro
Adds project-specific content or integration handling immediately before the standard csv export step.
Name carrentory_before_csv_export
Type Action
Edition Pro
Practical outcome Integration
Callback arguments $context, $component
Return value None. WordPress ignores action callback return values.
Minimal safe example
add_action( 'carrentory_before_csv_export', function ( $context, $component ) {
    do_action( 'my_site_carrentory_event', $context );
}, 10, 2 );
carrentory_before_payment_webhookAction Free
Adds project-specific content or integration handling immediately before the standard payment webhook step.
Name carrentory_before_payment_webhook
Type Action
Edition Free
Practical outcome Integration
Callback arguments $handler_key, $handler
Return value None. WordPress ignores action callback return values.
Minimal safe example
add_action( 'carrentory_before_payment_webhook', function ( $handler_key, $handler ) {
    do_action( 'my_site_carrentory_event', $handler_key );
}, 10, 2 );
carrentory_booking_email_payment_rowsFilter Free
Extends the reviewed booking email payment rows integration data while preserving validation and protected boundaries.
Name carrentory_booking_email_payment_rows
Type Filter
Edition Free
Practical outcome Integration
Callback arguments $rows, $booking_id, $method, $payment_display, $include_instructions, $admin
Return value Return $rows with the same documented data type.
Minimal safe example
add_filter( 'carrentory_booking_email_payment_rows', function ( $rows, $booking_id, $method, $payment_display, $include_instructions, $admin ) {
    // Adjust only documented or project-owned values.
    return $rows;
}, 10, 6 );
carrentory_booking_pricing_snapshot_metaFilter Free
Extends the reviewed booking pricing snapshot meta integration data while preserving validation and protected boundaries.
Name carrentory_booking_pricing_snapshot_meta
Type Filter
Edition Free
Practical outcome Integration
Callback arguments $meta, $pricing, $booking_id, $context
Return value Return $meta with the same documented data type.
Minimal safe example
add_filter( 'carrentory_booking_pricing_snapshot_meta', function ( $meta, $pricing, $booking_id, $context ) {
    // Adjust only documented or project-owned values.
    return $meta;
}, 10, 4 );
carrentory_csv_escape_valueFilter Free
Extends the reviewed csv escape value integration data while preserving validation and protected boundaries.
Name carrentory_csv_escape_value
Type Filter
Edition Free
Practical outcome Integration
Callback arguments $value, $context
Return value Return $value with the same documented data type.
Minimal safe example
add_filter( 'carrentory_csv_escape_value', function ( $value, $context ) {
    // Adjust only documented or project-owned values.
    return $value;
}, 10, 2 );
carrentory_csv_rowFilter Free
Extends the reviewed csv row integration data while preserving validation and protected boundaries.
Name carrentory_csv_row
Type Filter
Edition Free
Practical outcome Integration
Callback arguments $row, $context
Return value Return $row with the same documented data type.
Minimal safe example
add_filter( 'carrentory_csv_row', function ( $row, $context ) {
    // Adjust only documented or project-owned values.
    return $row;
}, 10, 2 );
carrentory_feature_definitionsFilter Free
Adds custom feature definitions before registration. It cannot replace ownership, package or availability metadata for built-in Free or Pro features.
Name carrentory_feature_definitions
Type Filter
Edition Free
Practical outcome Integration
Callback arguments $definitions
Return value Return $definitions with the same documented data type.
Minimal safe example
add_filter( 'carrentory_feature_definitions', function ( $definitions ) {
    $definitions['my_site_reporting'] = array(
        'label'             => 'My Site Reporting',
        'description'       => 'Project-specific reporting metadata.',
        'group'             => 'reports',
        'owner'             => 'custom',
        'package'           => 'my-site',
        'default_available' => true,
        'implemented'       => true,
    );
    return $definitions;
}, 10, 1 );
carrentory_i18n_editable_localesFilter Free
Extends the reviewed i18n editable locales integration data while preserving validation and protected boundaries.
Name carrentory_i18n_editable_locales
Type Filter
Edition Free
Practical outcome Integration
Callback arguments $locales
Return value Return $locales with the same documented data type.
Minimal safe example
add_filter( 'carrentory_i18n_editable_locales', function ( $locales ) {
    // Adjust only documented or project-owned values.
    return $locales;
}, 10, 1 );
carrentory_multilingual_setting_field_typesFilter Free
Extends the reviewed multilingual setting field types integration data while preserving validation and protected boundaries.
Name carrentory_multilingual_setting_field_types
Type Filter
Edition Free
Practical outcome Integration
Callback arguments $field_types, $component
Return value Return $field_types with the same documented data type.
Minimal safe example
add_filter( 'carrentory_multilingual_setting_field_types', function ( $field_types, $component ) {
    // Adjust only documented or project-owned values.
    return $field_types;
}, 10, 2 );
carrentory_payment_gatewaysFilter Free
Extends the reviewed payment gateways integration data while preserving validation and protected boundaries.
Name carrentory_payment_gateways
Type Filter
Edition Free
Practical outcome Integration
Callback arguments $gateways, $payment_component
Return value Return $gateways with the same documented data type.
Minimal safe example
add_filter( 'carrentory_payment_gateways', function ( $gateways, $payment_component ) {
    // Adjust only documented or project-owned values.
    return $gateways;
}, 10, 2 );
carrentory_payment_webhook_handlersFilter Free
Extends the reviewed payment webhook handlers integration data while preserving validation and protected boundaries.
Name carrentory_payment_webhook_handlers
Type Filter
Edition Free
Practical outcome Integration
Callback arguments $handlers, $payment_component
Return value Return $handlers with the same documented data type.
Minimal safe example
add_filter( 'carrentory_payment_webhook_handlers', function ( $handlers, $payment_component ) {
    // Adjust only documented or project-owned values.
    return $handlers;
}, 10, 2 );
carrentory_pro_loadedAction Pro
Fires after the public CarRentory Pro plugin object finishes loading so compatible integrations can attach to supported public contracts. It does not activate features or expose license state.
Name carrentory_pro_loaded
Type Action
Edition Pro
Practical outcome Integration
Callback arguments $plugin
Return value None. WordPress ignores action callback return values.
Minimal safe example
add_action( 'carrentory_pro_loaded', function ( $plugin ) {
    do_action( 'my_site_carrentory_pro_ready', $plugin );
}, 10, 1 );
carrentory_settings_registry_registeredAction Free
Notifies custom integration code when settings registry registered occurs, using only the documented callback context.
Name carrentory_settings_registry_registered
Type Action
Edition Free
Practical outcome Integration
Callback arguments $settings_component
Return value None. WordPress ignores action callback return values.
Minimal safe example
add_action( 'carrentory_settings_registry_registered', function ( $settings_component ) {
    do_action( 'my_site_carrentory_event', $settings_component );
}, 10, 1 );
carrentory_settings_schema_fieldsFilter Free
Extends the reviewed settings schema fields integration data while preserving validation and protected boundaries.
Name carrentory_settings_schema_fields
Type Filter
Edition Free
Practical outcome Integration
Callback arguments $fields, $settings_component
Return value Return $fields with the same documented data type.
Minimal safe example
add_filter( 'carrentory_settings_schema_fields', function ( $fields, $settings_component ) {
    // Adjust only documented or project-owned values.
    return $fields;
}, 10, 2 );
carrentory_settings_sensitive_keysFilter Free
Adds custom setting keys to the protected sensitive-key list. Existing protected keys are always retained and cannot be removed.
Name carrentory_settings_sensitive_keys
Type Filter
Edition Free
Practical outcome Integration
Callback arguments $keys, $settings_schema
Return value Return $keys with the same documented data type.
Minimal safe example
add_filter( 'carrentory_settings_sensitive_keys', function ( $keys, $settings_schema ) {
    $keys[] = 'my_site_api_token';
    return array_values( array_unique( $keys ) );
}, 10, 2 );
Pro
CarRentory Pro
CarRentory Pro is an optional separate add-on for advanced pricing, Stripe payments, financial visibility and faster booking administration. CarRentory Free remains fully usable without it.
Install and activate Pro
Keep CarRentory Free installed and active.
Choose a Pro license on the CarRentory pricing section .
Download the Pro ZIP from the Freemius Customer Portal .
In WordPress, go to Plugins → Add Plugin → Upload Plugin , upload the Pro ZIP and activate it.
Enter the license when prompted, then confirm that the Pro settings and tools are visible.
CarRentory Pro is an add-on and requires the Free plugin. Licenses, downloads, renewals and invoices are managed through Freemius.
Pro
Seasonal Pricing
Open a vehicle and add one or more seasonal periods with a start date, end date and daily price.
Example
Start: 1 July
End: 31 August
Daily price: EUR 90
Both boundary dates are included. Periods cannot overlap. Days outside a seasonal period use the vehicle’s base daily price.
Pro
Location Fees
Open a location and set an optional pickup fee, drop-off fee or both.
The pickup fee is added once for the selected pickup location.
The drop-off fee is added once for the selected return location.
If the same location is used for both, each configured fee still represents its separate service.
Location fees are added before VAT is calculated.
Pro
Stripe Checkout and Webhook
Enable Stripe in CarRentory → Settings → Payments . Start in test mode and add the matching test secret key, payment title and webhook secret.
Create a public HTTPS webhook endpoint in Stripe Dashboard:
https://your-domain.com/?carrentory_stripe_webhook=1Events to listen for
checkout.session.completed
checkout.session.expired
payment_intent.payment_failed
After saving the webhook secret, complete a Stripe test booking and confirm that the payment status updates in CarRentory. Enable automatic booking confirmation only after the webhook test passes.
Pro
Inclusive VAT, Reports and Admin Tools
Inclusive VAT
Enable Prices include VAT in CarRentory → Settings → Tax / VAT when the prices entered for vehicles, seasonal periods, extras and location fees already include tax. CarRentory separates the net and VAT amounts for the breakdown without adding VAT a second time.
Choose either inclusive or exclusive VAT to match how your business enters prices. Existing bookings retain their saved pricing snapshot and are not recalculated when settings change.
Financial reports
Page What it shows Export
Payments Report Revenue, paid amount, balance due and booking totals grouped by payment status. Filtered CSV from the page toolbar. Outstanding Balance Bookings with unpaid or partially paid balances, customer contact details and the amount still due. Filtered CSV from the page toolbar. Dashboard Financial summary cards for a quick daily overview. No dashboard export; use the reports for detailed CSV data.
Where print and CSV are available
Bookings list: use Export CSV for the filtered list, or select bookings and choose Export selected to CSV from Bulk actions.Bookings list: use the Print row action for one booking.Booking edit screen: use Print Booking while reviewing the full booking.Booking Calendar: export the filtered calendar to CSV and use the row-level print action for an individual booking.Payments Report: export the currently filtered financial report to CSV.Outstanding Balance: export the currently filtered balance report to CSV.
Print views, reports and CSV files read the saved booking snapshot. They do not recalculate old bookings with current vehicle prices, seasonal rates, fees or VAT settings.
Faster booking administration
Quick row actions let authorized administrators update booking status and payment status without opening every booking. Review the new status immediately after each action, especially before sending customer communication.
Pro launch checklist
Seasonal boundary dates
Base-price fallback
Pickup and drop-off fees
Inclusive or exclusive VAT
Stripe test payment
Stripe webhook update
Saved booking total
Customer and admin emails
Print and CSV totals
Reports and outstanding balance
Need help with setup?
Send a support request with your website URL, plugin version, WordPress version and a short description of the issue.